Category Archives: Nuvem

PROJECT Nuvem a la Alpaca & Silk


Nuvem

We just received a shipment of a Drops Brushed Alpaca and Silk and I was thinking “Wouldn’t it be divine to make a big, light, cozy wrap with it?!” Well, great minds think alike, because at least 50 other people already came up with the same brilliant idea and used if for one of my favourite wrap patterns, Nuvem. The Drops Brushed Alpaca and Silk is a super light and airy blend of brushed alpaca and silk – it looks like kid mohair, but feels like baby alpaca (ie. very, very happy, not scratchy). The other happy part is the price; Drops yarns are very affordable and you can make this wrap for under $50!

The pattern is pretty straightforward, the only novel part is the cast-on. You can make it as large or as small as you like, the pattern is based on the total weight of the yarn you’re using, so having a kitchen scale at your disposal is helpful (although not necessary). If you use this particular yarn use larger needles (4.5mm/US7), and cast on about 123 sts.

Materials

  • Drops Brushed Alpaca and Silk: 6 to7 skeins (or more if you prefer, it’s pretty flex)
  • TWO 4.5mm/US7-47″ or 60″ circular needles
  • stitch markers
  • tapestry needle
  • Pattern: Nuvem


FINISHED Nuvem

wollmeise wrap nuvem.png

Nuvem

I’m sorry it’s taken so long to blog this FO! My Nuvem was done a while ago, but as you can imagine, winter is a hairy time of year in a knitting store, and non-winter projects tend to get shoved down the priority list. Anyway, I loved it. I loved making it, and I love the finished project. As soon as it was complete I started planning the next one! I used a yarn we no longer carry (Wollmeise Lace) but you can really use any lace weight or fingering weight yarn. You can also make a larger version (like this one) or a smaller wrap (we did one few years ago): See our Nuvems on Ravelry HERE!

The hardest part of the project was the cast on. Once you get going it’s almost mindless – great for binge-watching can’t-look-away shows or those times in your life where ‘brain-no-work-good’.

Notes for Next Time

I’d like to make my next Nuvem in a lighter weight laceweight yarn, I’m thinking something really airy and lofty, like Malabrigo Lace Baby Merino. The yarn I used last time is lovely, but it’s heavier and closer to a fingering weight – perfect for fall, but I want something lighter for spring. The lighter weight yarn will also pack smaller and be easier to cart around

I also really liked using interchangeable needles for my Nuvem: when the project got really large I was able to transfer all the stitches onto a single needle with a very, very long cord (I went to 60″). I used the Addi Turbo interchangeable needles (I already had a set so I bought an extra set of tips), but the Knitter’s Pride interchangeables are also a great, economical option since the extra cables only cost $3.47.

Materials


PS. Unfortunately, the belt in the picture above isn’t available for sale anywhere: I found it about 10 years ago at a vintage store in San Francisco.  

KNIT HACK Nuvem Needles

Nuvem

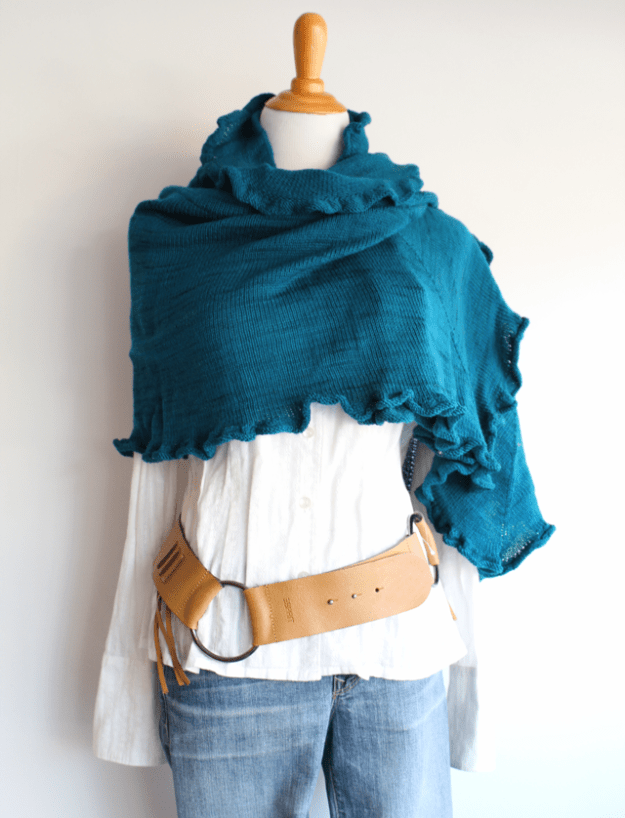
We’ve made a Nuvem for the store before (see our last Nuvem), and I thought it would be a good travel project for my holiday in California. After I wound up the skein I looked down and thought: “Oh crud, what have I done?! That is a dump-truck sized ball of skinny yarn, how am I ever going to get through it?” Well, I’m happy to report that my moment of project panic abated once I started knitting, I got used to working with the skinny yarn fairly quickly, and it was a good travel project. I’m not a laceweight kind of person, but the Wollmeise Lace has a lot of body to it and is easy to hold on to and work with. The colour is beautiful too, I choose a saturated teal blue (Neptun).

Materials

Notes

If you want to you can make a Nuvem with fingering weight yarn. To make a smaller, thicker version of the wrap, you can use about 800m of fingering weight yarn and 4mm/US6 needles.


Blog Nuvem 1.jpg

Nuvem Hack

Nuvem is a fairly simple project, there are just a few obstacles to getting it set up. The first is the cast-on, which is unusual, but not hard once you watch a video or follow a tutorial (which are included in the pattern, so not to worry, no hack needed). The second is the needle situation. The project is worked from the center out, but it’s knit in an oval, so you need to use TWO circular needles to do this. It’s the “two circulars at the same time” technique, which some people use instead of the magic loop technique. Don’t worry, it isn’t scary, when you use this method you only need to work with one needle at a time, the second is just hangin’ out, on hold. Normally people use the two circulars method to knit things with a small circumference, like a sock or a hat, and it’s easy to distinguish the two needles from each other. With a larger project like the Nuvem, it’s a bit harder to see what you are doing.

Normally people use the two circulars method to knit things with a small circumference, like a sock or a hat, and it’s easy to distinguish the two needles from each other. With a larger project like the Nuvem, it’s a bit harder to see what you are doing, and which needle is which. The pattern suggests you use two different types of needles (ie. one wood, one metal), but I don’t love this solution because I find that my tension is different on different types of needles. Additionally, you can’t take the exact size of you needles for granted, the manufacturing of each company is different. My solution was to use two sets of the same needle (Addi Click interchangeable bamboo – always great for flying) and I colour coded the needle tips. How does one colour code Knitting needle tips? Our method has to be bright, customizable, easy to see, sturdy, resilient, and also removable – I used Nail Polish.

Blog Nuvem 5.jpg

Life Hack: I keep a cheap collection of bright, distinct colours of nail polish around the house and/or office. Mine came from the dollar store and cost $3. They don’t have to be good polishes, you’ll never use them on your nails, and you don’t have to take special care of them, but they are extremely useful for labeling and organizing things. I am especially fond of colour coding my keys with them, and you can also write on white polish.It’s removable with nail polish remover, which can also be obtained cheaply at the dollar store or drug store. 

Blog Nuvem 3

Painting Your Needles

  • Paint your needles FIRST. Do not cast on until after you paint.
  • Use bright colours that are easy for you to distinguish from each other. I used Pink & Orange, but you might be better with a higher contrast like Green & Red, or Blue & Orange.
  • I painted on the METAL portion of the needles, not the wood (you won’t be able to remove polish from the wood without ruining the finish on the needles). If you don’t have a metal portion on your needles you can paint the plastic cord.
  • Paint on BOTH sides of the needles for maximum visibility.
  • Make sure your paint is dry before starting to cast on. Tap it and check t make sure there is no paint on your finger. If there is, wait longer.


Blog Nuvem 2

Ta-Da! The pink goes with the pink, and the orange goes with the orange. I have to say I’m extremely pleased with this hack; I was constantly looking to reorient myself (especially when taking my project out of the bag) and finding the other end of the needle was using was a SNAP!

FINISHED Nuvem


Nuvem 4


Nuvem

We just finished our store sample Nuvem this weekend and I couldn’t he happier with it! It’s got to be the loveliest, most wearable wrap I’ve ever come across (actually, I have one just like it that I bought in Paris a million years ago, a real wardrobe staple, but I think that just proves my point). If you’re the kind of person who shies away from paying for patterns I recommend this one, it’s a good investment, you’ll love your Nuvem and want to make it again and again.

The wrap is made in one piece, worked simultaneously on two long circular needles (don’t worry, it isn’t difficult, these things always sound harder than they are) from the centre out. Actually, once you get it set up it’s mostly mindless knitting – perfect for the cottage, patios, travel, or Game of Thrones. If you’re the kind of person who hates to purl you’ll be especially happy, it’s all knit stitch in the round.

Notes

We used 2 skeins of Malabrigo Mechita, yarn of gorgeous happiness. We didn’t make it super full sized, but two skeins got it just right, a nice size between scarf and wrap. If you want a proper wrap you’ll definitely need an extra skein, and for a big wrap get 4 skeins total (see filzwichtel’s nuvem made with 4, it’s amazing).  We wet blocked ours in Eucalan and laid it flat to dry, stretched and pinned down at intervals.

Size

These are the dimensions for OUR project after blocking and un-stretched. You can make your Nuvem larger if you choose, see the Nuvem pattern for full details (theirs was 68″x30″/170cm x 75cm) or browse the Helpful Projects on Ravelry.

  • Length end to end: 60″/152cm
  • Width at middle: 16.5″/42cm

Materials


Shop Online Button Turquoise 250w


Other Yarn Options

You can usethe same yarn we did,  Malabrigo Mechita, or substitute any of the following yarns ….

Madelinetosh Tosh Merino Light: 2 skeins (3 to 4 for larger)

Malabrigo Silkpaca Lace:  3 skeins (4 for larger, use 3.5mm/US4 needles)

Malabrigo Lace Baby Merino: 3 skeins (4 for larger, use 3.5mm/US4 needles)

Freia Ombre Lace: 2 skeins (or 3 for really big, use 3.5mm/US4 needles)

Manos del Uruguay Alegria: 2 skeins (3 to 4 for larger)

Manos del Uruguay Alegria Watercolors: 2 skeins (3 to 4 for larger)

Cascade Heritage Wave: 2 skeins (3 to 4 for larger)