Category Archives: Knit Hack: Stash-Busting Sock Yarn

PROJECT Snap

Snap

I tried this pattern a few weeks ago, and I thought it would make a great post-holiday knit because it makes great use of bits ‘n bobs of stash yarn. It’s really nice to find a stash busting project that’s small and fast – so many are blankets! The pattern is Snap from Tin Can Knits, who are great designers (and are very reliable).

The colour variation and gradation are achieved by working with multiple strands of yarn held together and periodically changing them out. I used 4 strands of fingering weight yarn held together, although the pattern offers guidance for combinations with lace weight and sport/DK weight yarn. Working with multiple strands of yarn wasn’t hard, but if this is a new thing for you it’s just a good idea to take things slow and don’t rush your stitches.

All of the yarn I used was fingering weight from stash, and almost all of it was variegated. I worked the ribbing in a combination of 4 colours, and then I started changing out a single strand of yarn every 4 rounds, graduating from the darkest colours to the lightest. I think I used approximately 9 to 10 different colours/yarns in all. I started with the darkest greens and then transitioned up through the lighter or more yellowy greens, and then into the yellows.

I’ll be honest and tell you that while I was working on the hat I fussed in my head about which colour should go next, but I don’t think it was necessary. There was so much going on visually with 4 strands of variegated yarn, and I had so many colours that were somewhat close, that each individual change of yarn didn’t make a huge difference. The hat is knit on the knit side and then turned inside out after it is finished, and the colour changes are much more subtle on the purl side.

I made the size “adult S/M”, but after blocking it fits an adult M or 22″ head. If you are knitting for a smaller head (20.5 to 21″) I suggest going down a size. The fabric is heavy, a bit on the dense side (which makes sense, sock yarn doesn’t tend to be fluffy stuff).

Size

  • baby (toddler, child, adult SM, adult L)
  • fits head 16 (17.5, 19, 21, 23)” around

Materials

KNIT HACK Granny Stripe Ends (Part 6)

Granny Stripe Blanket Aug 17 Ends.jpg

For all the posts in this series, you can go HERE!

I’ve been making good progress on my blanket, I’d say it’s about 45% finished, but the ends have started driving me up the wall. They’re getting a little tangled and in the way when I work, so I’ve started weaving them in. I tried weaving them in from the bottom up, but it was too excruciatingly boring, and instead employed a childhood game. Like most kids, my brother and I weren’t into tidying or putting our toys away, so my mom came up with a game. Depending on the quality of our mess, sometimes she would have us put the toys away by brand, other times it would be by colour, or size. So I started weaving in my ends by colour – all the reds first, then the orange, then the pink … really whatever tickled my fancy. It worked, I was distracted from the tedious exercise and the ends thinned out.

Granny Stripe blanket Aug 17

KNIT HACK Weaving In The Ends

Weaving in the ends on a granny stripe blanket isn’t especially hard, but to make it look nice you’ll have to do it with a darning needle. Because of the granny stripe technique, the ends do not look nice worked in as you crochet, they will not be visible on the back of the work. As a reference, I leave a generous tail at the beginning and end of each row, at least 12″/30cm. Having a good amount of yarn makes weaving in the ends much easier and more secure.


Granny Spripe Blanket Weaving In Ends 1

1. With a darning needle weave the end you want to work (here GREEN) up in through the stitch or the same yarn above (so Green goes through Green). On rows where there is only one post or stitch at the start of the row you may want to go right through this post to conceal the yarn. On rows where there are two posts or stitches, you don’t need to do this.


Granny Spripe Blanket Weaving In Ends 2

2.  Thread needle through the tops of the stitches of the colour you are weaving in (the Green end goes into the tops of the Greens) for THREE or FOUR full clusters or the colour of the row above (here you can see the needle going through two).


Granny Spripe Blanket Weaving In Ends 3.jpg

3.   Turn your needle and work back across in the opposite direction.


Granny Stripe Blanket Weaving In Ends 4

4.  At the end of the row evaluate your work, give it a small tug to make sure the yarn is settled, and you can trim your end.


Granny Stripe Blanket Aug 17 2

A Tale of 1.25 Blankets – Stash-Busting Sock (Part 5)


Granny Stripe Blanket Aug 2, 2017.png

Left: the first version of the blanket. Right: the second incarnation.


For all the posts in this series, you can go HERE!

This post isn’t really a Hack post, it’s more about sharing insights – OK, it’s really just a project update. I’m not usually into sharing the ins and outs and ups and downs of making things, but this particular project involves my ‘creative process’, and I know that some people find it a slightly mysterious state that they’d like some insight into, and I’m happy to share.

I think when we last left off ,I was rolling along and had figured out how many rows I needed to work each day to get the blanket done by the end of the summer. I also had an idea about my colour distribution, and basically, I thought I was off to the races. Hahahahahaha! The best laid plans … after working about twelve inches I found, despite all my planning, I didn’t like my blanket.

1. Too Wide

I had overestimated the size I really wanted, it was working up to be about a queen size, and I just wanted a throw. Also, the rows were taking FOREVER! Part of the problem might have been the fabric’s natural stretchiness once was worked up on a larger scale (the stitch is very stretchy in the fingering weight merino wool), but I think I just chose the wrong finished size.

So I started again, from scratch. This time I chained 242 stitches to make a blanket narrower, it is working up to about 51″ wide.  To get an accurate dimension you need to measure it on a flat, hard surface, like a table or the floor. You won’t get an accurate measurement on a bed or sofa. I guess I did have a HACK for you, after all!

2. Hated the Colour

Everyone else liked it, and the colours looked gorgeous together, but I didn’t dig it. My rainbow system (above left) was VERY rainbowy, and the prospect of that much rainbow in a blanket was a bit too rainbow-brite for me. The prospect of a queen sized rainbow blanket was too much for my delicate aesthetic sensibilities. It was also kind of boring for me to work, it was very predictable, andthe harmony and redundancy weren’t working for me.

My new ‘system’ is simpler but subjective. I’m alternating warm (red, orange, yellow) and cool (green, blue, purple) colours. I’m also alternating light and dark colours, bright and muted colours – basically trying to create a contrast between colours. I like to create a tension between colours. Do you remember the Kandinsky painting at the start of the movie Six Degrees of Separation? It was a double sided painting; one side was an expressive, chaotic style, and the other more controlled. Well, I’ve always appreciated a graphic, controlled design aesthetic, but my soul as an artist is in the chaos camp.

People often ask me if I like their colour choice, and I always answer “What I like doesn’t matter.” This isn’t just a tactful way to respond to a colour combination that turns my stomach, it’s the truth, my preference is completely irrelevant. I don’t have to work with your colours, and I don’t have to live with them. My job isn’t to tell you what I like, my job is to help you find what YOU enjoy, what looks good on you, and which colours are complimentary and work well with your project. That said, if you like what I like, I’m more than happy to share!

Oh, BTW, I don’t weave in the ends until the end, because as you can see, it ain’t done until it’s DONE, and trying to rip back work when you’ve woven in the ends is a special kind of hell. Another Mini-Hack!

Conclusion

So I’m back on track …. sort of. My ‘schedule’ was totally shot to hell, but I’m really enjoying the project now, so I’m happy. As for the creative process, it’s kind of a misnomer. It’s really more of a progression, an evolution with fits and starts, giant strides and dead ends. Setbacks aren’t failures, just diversions, and sometimes they can be extremely fruitful and get you where you need to go.


Granny Stripe Blanket Aug 3 COMBO

KNIT HACK Stash-Busting Sock (Part 4)


Granny Stripe Blanket BLOG July 11 2

For all the posts in this series, you can go HERE!

Grany Stripe Blanket

I am very pleased to let you know that my sock yarn stashbusting granny stripe blanket  is coming along swimmingly! Now that I’ve worked a few rows I’ve gleaned more insights ….

How Much Yarn?

If you don’t want to run out of yarn part-way through a row, you are going to need to know how much each row uses. I measured mine at around 9g of sock weight yarn, but everyone is different and this may not be the amount you use. You can glean this very useful knowledge fairly easily (I would wait until after you’ve worked a few rows and fall into a flow with the stitch):

  1. With your digital kitchen scale, weigh the ball of yarn you are about to use.
  2. Work a row, break yarn.
  3. Weigh the ball of yarn again.
  4. Subtract the second weight from the first weight – this is the amount of yarn you used.

Project Notes

I ALWAYS suggest that you keep project note in your Ravelry Notebook. You’ll inevitably need to remember something about the project at some point down the line, and all the details will be waiting for you there. It’s also helpful to see other people’s projects, so it’s nice to pay-it-forward, share and contribute to the community. Finally, you get to show off your work, people will say nice things to you and warm your heart.

Useful things to take note of:

  • hook/needle size used
  • tension/gauge of your project
  • yarn/s used
  • modifications made
  • finished measurements
  • advice you’d give other people about your experience, or anything you’d want to know if you did this project again

Establishing Timelines

Blankets are big-ish projects and I know myself – if I don’t finish this one by the end of the summer it won’t get done for a looooooong time. It’s good to set a goal like a best-before-date, and you’re most likely to be successful achieving a goal if you break down the work into daily quantifiable chunks.  I’ve measured my gauge and I’m working at approximately 12 rows = 4″ (10cm), or 3 rows per inch. I also measured my started project and it is about 65″ wide (unblocked), and I’ll aim to make a square blanket so it’ll be about 65″ high. There are about 50 more days until September. I have worked 25 rows so far.

Here’s how you figure out the math:

  1. 65″ high x 3 rows per inch = 195 total rows required
  2. 195 rows total – 25 rows completed = 170 rows to complete
  3. 170 rows to complete / 50 days to complete = 3.4 rows per day to complete

If I work 4 rows per day I should have this part of this project completed in about 43 days – not bad. I’ll still need to weave in the ends and work a border around the edge, so the extra week will be a good buffer to finish this project by September.

I’m not super disciplined, so to keep myself accountable I’ll print off a calendar and mark my rows every day. I kind of enjoy this approach, if I fall behind I know I have to catch up the next day, or I’ll work ahead of time and carry that balance forward. Really, whatever works for you is good.

Not sure how long it takes for you to complete a row? No problem, just time yourself working a row using the Stopwatch function in the Clock App on your smartphone or tablet (I have an iPhone, but if you have another just Google how to find and use the stopwatch function, Google knows everything). I just timed myself and it took about 18.5 minutes to complete a row (probably not my best time, but it isn’t the Olympics).

KNIT HACK Stash-Busting Sock (Part 3)


Crochet Blanket Swatch BLOG.jpg

For all the posts in this series, you can go HERE!

Swatching

Before you start your project I urge you to swatch, especially to find the right needle or hook size. For crochet, holding one strand of sock weight yarn, a 3.5/E hook is generally good (if you are a tight crocheter, if you are loose go down). For knitting, holding 2 strands of sock weight yarn together, 4.5mm/US7 or 5mm/US8 needles should be good. Everyone’s tension is different, so play around to find the size that you are comfortable with.

I always keep track of my choices in my Ravelry Projects, it’s a great place to keep your notes because they never get lost and you can look info up from your smartphone.

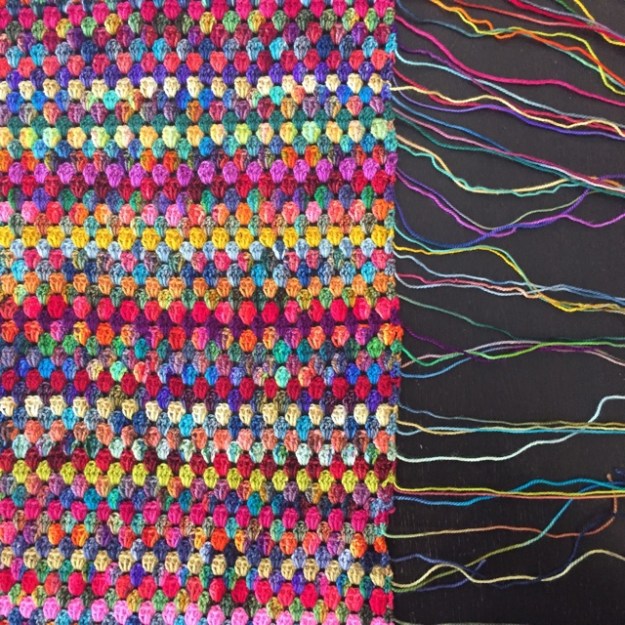
Now, everyone emphasises how important swatching is for the success of your final project, and I can’t *make* you swatch, but I think I can motivate you to swatch. I made a small swatch and am glad I did, as I found out several VERY useful things …

I made a smallish swatch (see picture above), about the size of a blanket for a doll, and am glad I did, as I found out several VERY useful things … knowledge is power! 

Hook Size

I preferred a 3.25mm crochet hook since my crochet tension is on the loose side. I also found out that I have two D hooks made by the same company (in different styles) that are actually different sizes: one is 3mm and the other is 3.25mm. 

Project Changes

I wasn’t loving my yarn worked up in a log cabin style, it didn’t suit the predominantly smooth texture and mostly variegated colour ways. I am changing to a granny stripe blanket .

Enjoyment

I found the granny stripe blanket quite easy and simple. I thought I might find it a bit boring, but I think it’s actually kind of zen, and frees up my mind to play with colour.

Accurate Measurements

I now have a more concrete tension measurement. The pattern is a multiple of 3 plus 2, so I swatched with a chain of 41 stitches, which measured approximately 8.5″ (I laid it flat on a table and measured with a ruler. I did not get around to blocking, but for a true gauge measurement you really should, as textiles can loosen up). Your tension will not be the same as mine, you need to check yours for an accurate measurement.

Project Size

I have a lot of yarn, but I’d like to finish this project this summer, so I’ll make it a lap blanket size, approximately 6 feet or 1.8m (182cm) wide should be sufficient. A chain of about 348 should be right. The pattern is a multiple of 3 plus 2, so 347 would be the right number.

Alternate Techniques

I followed the pattern and did not enjoy the long chain that you start with (the prospect of 347 wobbly chains doesn’t appeal), or how you have to enter the stitches in the first row. I’m not a novice, so I’m going to try starting with a “foundation since crochet” (FSC) chain. I like the idea of starting with an FSC because it gives me a good idea of how wide my work will actually be (unlike a regular chain, which really isn’t helpful in that department), and it will be easier to work the first granny Row into. I’ll swatch this first to make sure I like the look and the technique works for me (no point in making 340 stitches and finishing out I don’t like it). Before I start the real project I’ll also have to decide if this is the colour I want the first border to be. And of course, I have to practise the FSC, it’s been a while since I’ve done it and I need to consult a tutorial for a refresher (The best instructions I’ve ever come across is in Jennifer Hansen’s Broomstick Lace Craftsy Class, but Purl Soho has a decent tutorial on their blog).

NOTE: after a practice go I also found that the FSC was tight on a small hook and should be worked on a slightly larger hook, I’ll try a 3.25mm or 3.5mm next time. Oh, and if you go with the FSC, most tutorials will tell you to put a pin in at a specific point -DO THIS, especially if you put your work down in the middle (otherwise you’ll never find where you are supposed to pick-up).

Colour Choices

I’ve been sorting out my approach to colour and experimenting as I swatch ….

1. The first aesthetic choice was to evict all of the muted colours. They weren’t making me happy blended in with the more saturated colours, so they are outie and can emerge at a later date in another project. The second colour issue I found was that I am very uncomfortable with the random look.

2.  I found that I am very uncomfortable with the random look.

3. The granny stripe pattern works with two rows per colour, but I like one row, it looks scrappier.

4. I like the occasional row of semi-solid colour, I have a lot of  yarn with complex colouration and the solids seem to break up the business of the variegated colours.

5. I like alternating between a dark/muted colour and a light/bright colour.

6. I think I will cycle through a row of each type of colour: red, orange/peach, yellow/gold, warm green, cool green, turquoise/aqua/teal, blue, cool purple warm purple, light pink/dark pink.

Fibre Choices

I’m enjoying the multi-ply yarns more than the single ply yarns. I don’t think I want this particular project to be a melange of different textures and just kind of stick to playing with colour.


Choosing a Colour Palette

If you are NOT artsy

If you are bad with colour and not very artsy, the most expedient choice would be to work with an ombre or a gradation. This means working through your colours in the order of the rainbow or something similar (see the colour wheel below for an idea) and within each colour group from light to dark. I like the KISS principle: Keep It Simple Sister! Another approach is to browse through other people’s projects on Ravelry.com, Pinterest, or instagram and find something that you enjoy – there’s no sense in reinventing the wheel, right? 

If you are KIND OF artsy

You have a choice to make: do you prefer chaos or control? Do you want your colours to complement each other and be harmonious and designy, or do you want them to clash and look random and scrappy?

colour wheel 1

Harmonious

If you want it harmonious consider placing cool colours (green, blue, purple) next to each other and warm colours (red, orange, yellow, pink) next to each other. Hold colours next to each other and squint your eyes (or remove your glasses) to get a better idea of whether they blend or clash.

Above is a colour wheel, which is kind of mysterious to people who have not been to art school or taken art classes. The colours opposite each other in the circle are a VERY high contrast and make each other ‘pop’ (it’s a bit of a harsh combination to my taste, I don’t really like them together). Colours next to each other in the circle are blendy. The colour next to the one at the opposite end of the circle often look nice

Clashy

If you like it clashy, combine colours that are opposites. Put bright or light colours next to dark or muddy colours. Place warm colours (red, orange, yellow) next to cool colours (green, blue, purple). Use a random number generator app (available free in your phone or tablet app store) to help choose the next colour group.

Personally, I like a controlled chaos. I’ll use a random number generator, but if I don’t like the choice I’ll run it again (and again, and again) until I come upon a colour combination I like.

If you ARE Artsy

You don’t need my help, you’ve already got it goin’ on.

KNIT HACK Stash-Busting Sock (Part 2)

For all the posts in this series, you can go HERE!

On Tuesday I talked about blanket projects that are perfect for sock weight stash-busting. Today I’m going to help you make your blanket look GREAT!  In 2014 I ploughed through my stash of bulky weight yarn and made my parents a magnificent house-warming blanket, and I’ll share my system with you.

NOTE: If you don’t have suitable stash yarn but want to make a Granny Stripe or Corner to Corner blanket (or something along those lines, I suggest using Cascade Ultra Pima and a 4mm hook (you’ll need at least 10 skeins for a lap blanket)

What You’ll Need

  • Large table or flat surface to work on
  • Large Ziploc bags, about 10 to 20
  • Masking tape & permanent marker
  • Digital kitchen scale (optional)

blog scrappy blanket 4.jpg

Preparation

1. On a large table or flat surface lay out your stash and group yarns by colour: pink, red, orange, yellow, green, turquoise, blue, purple, brown, cream, grey. Personally, I have broken my stash down into subsets: light pink, dark pink, red, orange, peach, yellow, warm green, cool green, green-blue, turquoise & teal, blue, cool purple, warm purple, brown, cream, light grey, dark grey.

2. If you have variegated colours that you don’t know where to put them, hold them next to each colour group and choose the one it blends with. If it doesn’t match anything (I had one odd-ball), you can either keep it as a wildcard or leave it out of the project.


blog scrappy blanket 3.jpg

3a. Bag your colour piles. Each subset gets it’s own bag.


blog scrappy blanket 2

3b. If your project is going to be a gradient or ombre, label each bag with it’s order of sequence (1, 2, 3, 4, … etc) with masking and a sharpie, and leave space on the label to write the weight later.

Blog scrappy blanket 1

4a. Weigh each bag and write down the weight on the bag. I recommend using metric measurements (grams) if your sale allows, it is precise (you can always convert to imperial measurements afterwards) and I round down.

4b. Add up the total weight of your yarn, and subtract about 50 to 100g for good measure. My total is around 3800g, which is probably enough to make a Queen sized bedspread. This doesn’t mean I *will* make a queen sized bedspread, I may not use ALL of my yarn, I might get bored with some colours, or only want to use a portion of them because I have so much (I’m heavy on the greens). About 1000g is ok for a lap blanket.

5. Evaluate your spectrum for gaps. You may or may not have noticed that I have next to no red in my stash, so I’ve bought myself a skein of red Fleece Artist Merino 2/6 in Ruby. I don’t have much yellow, but that’s ok, it’s kind of an accent colour, so I won’t use a ton. I also don’t have much in terms of a medium ‘pinky’ pink, just light and dark pinks, but I think I can live with that (if it starts to bother me I’ll buy some).

6. Wind up skeined yarn, but keep the label with them. If you don’t end up using that skein you’ll want to know what it is and how much of it you have.

7. Choose a project and/or method, for example:

Crochet

Knit

OK, I think we’ve done enough work for a day, in upcoming posts I’ll discuss strategies for combining colours and swatching. I know, swatching is a total turn-off, but my suggestions are sincere and come from my own, actual experience – it’ll be fun and EXTREMELY helpful. Seriously, I promise, it’s so, so, so useful. So good.


Blog scrappy blanket COMBO

FREEBIE Busting Sock Stash (Part 1)

For all the posts in this series, you can go HERE!


If you have a bit of a sock yarn (or fingering weight yarn) collection (and by collection I mean a hoard) you are in good company. Most of us are guilty of picking up something pretty on a whim but never getting around to using it. And then somehow that skein multiplies, and somehow you find yourself with a very large collection of pretty skeins. How many small shawls can a person wear? Do you really see yourself making that many pairs of socks? There are certainly people who can and will made those socks and shawls, but for the rest of us, we need an alternative.

The option I propose – a project that will utterly deplete your sock yarn stash and rid you of stash-shame – is a scrappy crocheted blanket. It’s simple, mostly brainless, and satisfying. The granny stripe version has been very popular on Instagram lately and I think it is a brilliant idea (plus, the people making them seem to be very happy and satisfied with their projects). You can also find ideas under the following hashtags:

How Much Yarn?

A lap blanket uses approximately 1000g (1kg) of yarn (the average skein of handpainted yarn is usually 100g, so you would need about 10 skeins).

Stash Busting Protocol

This type of project will use up a large portion of your sock/fingering weight stash, and banish stash-shame. That said,  many people (including myself) usually end up coming into the store for an extra skein or two of yarn to complete their project. Don’t feel bad, it’s very normal, your stash probably won’t have the full spectrum of colours you want to use, or you might not have quite enough yarn – whatever, it doesn’t matter because you get a gold star for using up your stash!

Hook Size

For sock weight yarn use a 3.5mm/E crochet hook.

Crochet vs Knit

I prefer crochet because it is faster, you weave in the ends as you go, it doesn’t require any seaming, and the aesthetic is well suited to a scrappy aesthetic. That said, you can certainly knit your blanket too … see our Easy Baby Blanket Pattern (a Corner to Corner style blanket) for an easy knitted option. To expedite the project I would hold 2 strands together and work with a 5mm/US8-36″ (or longer) needle.

Granny Stripe COOMBO 2

Granny Stripe Blanket

Attic24’s Granny Stripe Blanket is a great way to use up sock stash. If you have a really, really big stash you can group the colours before starting and create something in an ombre or chromatic style (above right, Scrappy Granny Stripe Blanket by louisap).

If you like a totally random, cottagey aesthetic, just go with the flow and grab whichever colour you like (above left,Molly Weasley Cozy Scrappy Granny Blanket by StitchingPlaza). When I do things like this I usually put colours together that have a high contrast, in both colour and intensity.


C2C COMBO


Corner to Corner Blanket (C2C)

A Corner to Corner type blanket is a great alternative to the Granny Stipe, especially if you don’t know how large you want your blanket to be. Like the Granny Stripe, you can organise your stash ahead of time and create a chromatic look (above left, Gradients C2C by GameCakes), or make it a bit more random (above right, Corner to Corner Stashbuster by coxabey).

granny stripe COMBO

Photos: Judymac21 and coxabey