Category Archives: stashbusting

Stash Game 2: Electric Boogaloo

Back-Story

StashGame is a virtual game where you send me a photo and description of your stashed, long neglected yarn and I’ll come up with at least one project idea for it and publish it here. There’s one hitch – you can’t request a type of project.

To enter, please send the following:

  • A clear photo of your yarn. It helps if I can get an idea about the colour as well as the texture (natural sunlight is best for taking pictures).
  • The name of your yarn (brand name and product name: for example Berroco Vintage)
  • The yarn’s weight (ex. 100g) and yardage (ex. 200m/220yds)
  • The yarn’s tension (ex. 18 sts & 24 rows = 4″)
  • The yarn’s suggested needle size
  • If available, the yarn’s Ravelry page: (ex. https://www.ravelry.com/yarns/library/berroco-vintage)
  • How much yarn you have
  • How long the yarn has been in your stash (I’m just curious)
  • Any interesting or pertinent back-story (if it has an interesting one). Was it a gift from someone special? Did you inherit it from your grandmother? Do you love it? Are you afraid of it? Do you hate it? (please note: if you hate it you should probably just break up with it and send it on to a better place)

Send your info through any of the following channels with the subject/hashtag #YarnStashGame:

Please Note:

When choosing yarns to StashGame I go with the flow and pick what feels right at the time. If I haven’t chosen yours please be patient, it’s time will come. It looks like our collective break with regularly scheduled life isn’t going to be ending any time soon, so we have lots of stash-gaming ahead. My life hasn’t really slowed down so much as shifted (facing new challenges and rising to them), so my goal is to post a new StashGame once a week.
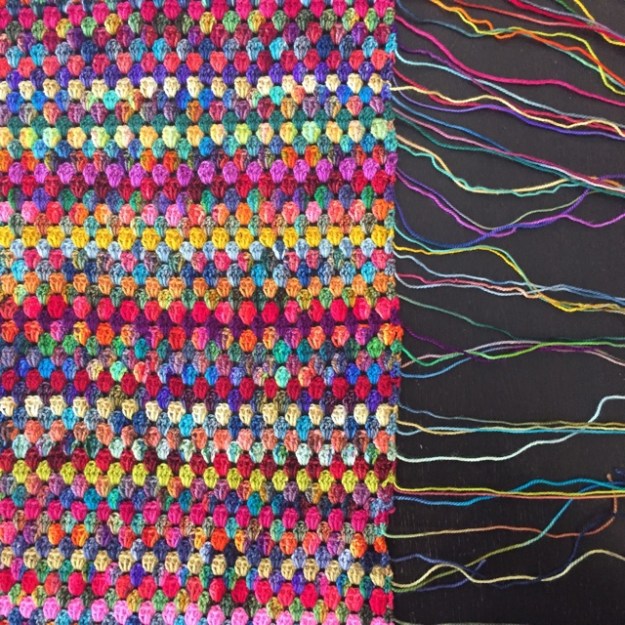
Drops Melody

Our second stash yarn comes from Lori Ann … it’s a super soft and fluffy blend of alpaca and wool that looks a lot like a vintage style mohair but feels like what we all wish mohair felt like (but doesn’t) – ie. like alpaca. I love the fuzzy texture (I was already thinking about bringing this yarn into the store next fall) and I like the funky combination of colours – there’s a hint of a reference to the industrial design of kitchen appliances circa 1970.

  • 71% Alpaca, 25% wool, 4% nylon
  • 50g/140m (153 yds)
  • Bulky weight
  • Suggested needle size: 7mm/US10.75
  • Notes: leftovers, probably totals about 460 yds total

I’d like to say that I did an exhaustive search and thought long and hard about this one, but I didn’t. It was bashert, I knew right away what this yarn needs to be ….

Colorful Clockwork Cozy

Like, seriously Lori Ann, if you don’t do it PLEASE let me! Your yarn NEEDS to be a clock cozy. As soon as Ikea reopens you need to haul you butt out there and get yourself a cheap ‘n cheerful Tjalla and knit it a sweater! A cozy, fuzzy, funky coloured, randomly striped mohairy sweater. You can either reduce the needle size to get a tighter tension or hold the yarn double – you’ll need to play around a bit. I’ve knit one of these once, I suggest you should get the clock first so you can ‘try it on’ as you go and gauge whether your band is wide enough. And when you’re finished please send a beauty shot.

I’m Knitting To ….

Since this one was short ‘n succinct (seriously, it is a moral imperative that that yarn become a clock cozy), I’ll include some extra ‘content’ … this is what I’ve been consuming while I knit ‘n stuff:

I’m Currently Listening to: Tara Brach (available on all podcast apps, Youtube, her website). The episode “Sheltering in Love pt.1” was so necessary, so important. I’ve been following all her pandemic related podcasts, they’re all been immensely helpful for getting through this challenging period.

I’m Currently Reading (on e-book): Letting Go by David Hawkins. I started this shortly before toilet-paper became a *thing*. I’m not sure if Hawkins is still alive, but the man is KILLIN’ IT! His interview with Oprah was also good.

I’m Currently Watching: Start Trek: The Next Generation (Netflix) with my Beau. The early shows aren’t great, but I think the interior design of the Enterprise really stands up, it’s still my favourite Enterprise. I also started watching Hilary (Netflix), which is interesting, and The Pizza Show (Crave), which isn’t great but I keep torturing myself and watching it because pizza is the only thing I miss about gluten.

I’m Connecting With: Myself … and meditating with the free Insight Timer app and occasionally Tara Brach’s short guided meditations. If you’re stuck at home this is an unprecedented opportunity to connect with yourself. Plus, meditation is REALLY helpful for negotiating fear, anxiety, vulnerability, depression, and all feelings both comfortable and uncomfortable. The book that helped me get past my fear of meditation was 10% Happier by Dan Harris … don’t worry, it isn’t new-age self-helpy stuff, it’s in the literary non-fiction or memoir genre. Plus, it starts with a cocaine addicted NBC news host who has a drug fuelled breakdown on live TV – any mistake you’ve ever made will feel demure compared to this guy’s, and he’s cool with it.

I’m Crafting: DIY Face Masks … well, I’m seriously thinking about it. I bought a mask on Amazon and have been wearing it out and about for a few days. It’s good, it fits beautifully and comes with extra filters (fancy!) but it doesn’t match my winter clothes (first world pandemic problems). Then, I came across this article in Science a few days ago, and I decided it is very important to me to make an effort not to accidentally give someone the virus if I’m asymptomatic and don’t know I have it (I see myself coughing for the very first time and accidentally taking out a whole retirement home … I don’t care to live with that). I discussed this with my Beau (who lived for many years in Hong Kong and has had both SARS and Swine Flu, so I figure he’s got some street cred in this department) and he agreed with my assessment and asked me to buy him a mask too (he insisted on black). Anyway, now I don’t feel right going out without a mask, but my mismatched mask in a spring floral print isn’t cutting it, it’s more of a cheerful May/June pandemic aesthetic, rather than a drizzly April mode.

I met a lady on the street yesterday morning wearing a snazzy mask and when I stopped her she said she’d sewn hers out of scrap fabric from around the house. The lovely woman even offered to make me one, but I was all “No thank you, I am super crafter, I am ON THIS!”, and then I flew away with my cape fluttering in the drizzly, miserable breeze. The first thing I found when I googled DIY masks was this Tutorial in the New York Times, so you know it’s going to be a bona-fide cultural phenomenon. There are already a bunch of video tutorials on Youtube, and crafters are selling their wares on Etsy too (not a bad activity for laid-off sewers to do).

Please note, if you are in a high risk category and need to prevent yourself from contracting the virus it is advisable you wear a proper medical mask. Fabric masks are suitable for those who want to prevent themselves from unknowingly shedding the virus and giving it to other people. Also, keep washing your hands (soap is kryptonite to COVID) and don’t touch your face.

See you soon!

xox Haley

Stash Game

Yay!!! Inaugural Stash Game! I hope this is a fun diversion!

Back-Story

StashGame is a virtual game where you send me a photo and description of your stashed, long neglected yarn and I’ll come up with at least one project idea for it and publish it here. There’s one hitch – you can’t request a type of project.

To enter, please send the following:

  • A clear photo of your yarn. It helps if I can get an idea about the colour as well as the texture (natural sunlight is best for taking pictures).
  • The name of your yarn (brand name and product name: for example Berroco Vintage)
  • The yarn’s weight (ex. 100g) and yardage (ex. 200m/220yds)
  • The yarn’s tension (ex. 18 sts & 24 rows = 4″)
  • The yarn’s suggested needle size
  • If available, the yarn’s Ravelry page: (ex. https://www.ravelry.com/yarns/library/berroco-vintage)
  • How much yarn you have
  • How long the yarn has been in your stash (I’m just curious)
  • Any interesting or pertinent back-story (if it has an interesting one). Was it a gift from someone special? Did you inherit it from your grandmother? Do you love it? Are you afraid of it? Do you hate it? (please note: if you hate it you should probably just break up with it and send it on to a better place)

Send your info through any of the following channels with the subject/hashtag #StashGame:

Please Welcome Our First Guest!

The first yarn looks to be a gorgeous 100% silk, fingering weight, single ply hand-dye:

  • Woollisa Silk Singles (we think, the ball-band is kinda spartan)
  • 100% silk, hand dyed in Italy
  • 100g/400m
  • Fingering weight
  • Suggested needles 3.5mm/US4 to4mm/US8
  • Notes: received as a gift by a beloved friend 7 years ago

Why This Yarn?

This yarn spoke to me for a few reasons:

  1. The owner has been afraid to use it, which means it’s time for them to use it.
  2. The type of fibre – it has a lot of limitations.

Category: Too Precious

This is a great example of the ‘Too Precious to Use’ stashed yarn. These yarns linger in our stashes for years, sometimes decades, waiting for the perfect project and the perfect pattern at the perfect time. We know we will receive a sign revealing what we are supposed to make with it, we just need to wait until all the planets and all their moons align ….

The entry point for this type of yarn problem is the descriptor PERFECT. In situations like this we’ve put this skein on a pedestal so high nobody could ever reach it, and unless you’re prepared to bring it down and live in the real, messy world, you might as well put it under glass. Don’t worry, I’ve been here, I’ve done it, I survived to tell the tale (it isn’t especially interesting).

Spoiler, if you are of the mind that perfectionism is a good thing, you’ll probably prefer to skip to the next section where I talk about the fibre.

So here’s the hitch – it doesn’t actually matter what you make with this yarn, because as long as it is on the perfection pedestal it will NEVER feel like it’s good enough or doing the yarn justice. So, you’ve got a choice, keep the yarn in it’s a safe little bubble of too-goodness, or use it and put yourself face to face with the uncomfortable feeling of not-good-enoughness. If you choose to move forward and use the yarn you’ll be putting yourself in a position of growth … but hey, it’s only string, it isn’t alive, so the experience shouldn’t be painful, just slightly uncomfortable and take you outside of your comfort zone.

One thing I suggest for getting this project off the ground is to reframe it, take the focus off of the self. Don’t use this yarn for making something for yourself, use it to make something for someone else. Since it was a gift from a beloved friend, I would make something for the person who gave it to me.

Project Limitations: Silk is Gonna Silk

This yarn is made from 100% Silk, which comes with its own set of issues. Silk has absolutely no memory, and it actually tends to grow with use. The more silk content in your yarn, the less shape it will likely hold. This means that it isn’t going to be useful for making anything that needs to have a shape or keep its shape. Hats, socks, fingerless gloves are all out and sweaters are tricky because of the growth factor. This sort of limits the types of projects that will work out successfully. The yarn is also thin, so wraps, scarves, wrappy-scarves, scarfy-wraps and shawls are the best options for a yarn like this. Types of lace where the yarn is wrapped around itself will bulk it up a little.

The silk will look good with lace, it won’t hold cables so if a design includes that it would have to be very deconstructed. This yarn is lovely and should probably be used on it’s own so it can shine. I would use pointy needles for this yarn, it will help scooping it up when you make your stitches. I would also advise using wood or less slippery needles, it will probably reduce accidents. Definitely be diligent and use a lifeline.

Herald

My suggestion for this yarn is the Herald wrap. I like the modernity of this openwork lace. It’s simple, timeless, and elegant. Plus, the yarn is a bright pink, so it’s going to dominate. Herald is worked on the bias as a scalene triangle, so it can be worn as a scarf or as a wrap, and has a cool asymmetrical sensibility (this translates to “easy to make, interesting to wear”). This lace also makes the most of the yardage available and doesn’t suck any up in a dense stitch like garter-stitch.

Materials

  • 400m of fingering weight yarn (my current favorite choice would be Fibre Company Meadow)
  • 4mm/US6 needles
  • tapestry needle
  • scrap yarn for lifeline (optional but advised)
  • Pattern

Stash Conclusions

1. I think I need to do a reassessment of my stash and see how much of it is in the “Too Precious to Use” category. I’m sure I’m DEEP down this rabbit hole!

2. Currently, we’re are all already well outside of our comfort zones, and I know it sounds strange, but now is actually the perfect time to push yourself further. Our fears are running rampant right now, and we want to avoid those feelings because they are extremely uncomfortable, but it’s actually ok to accept them. Fear is part of being a human being. If we hold on to the fear we get stuck in it (which I think is really just being mean to ourselves), when we accept it then it passes through us. This video by Tara Brach on dealing with pandemic fears is excellent.

3. The best way to get out of your head FAST is to think about how you can help others – it clears out an immense amount of space! Now is a great time to make gifts for others …. the holidays will come, I promise you, and next fall you’ll be thrilled to have already finished your gifts. You can also make gifts for right now for the people you care about, and help them get through this tough time.

PROJECT Snap

Snap

I tried this pattern a few weeks ago, and I thought it would make a great post-holiday knit because it makes great use of bits ‘n bobs of stash yarn. It’s really nice to find a stash busting project that’s small and fast – so many are blankets! The pattern is Snap from Tin Can Knits, who are great designers (and are very reliable).

The colour variation and gradation are achieved by working with multiple strands of yarn held together and periodically changing them out. I used 4 strands of fingering weight yarn held together, although the pattern offers guidance for combinations with lace weight and sport/DK weight yarn. Working with multiple strands of yarn wasn’t hard, but if this is a new thing for you it’s just a good idea to take things slow and don’t rush your stitches.

All of the yarn I used was fingering weight from stash, and almost all of it was variegated. I worked the ribbing in a combination of 4 colours, and then I started changing out a single strand of yarn every 4 rounds, graduating from the darkest colours to the lightest. I think I used approximately 9 to 10 different colours/yarns in all. I started with the darkest greens and then transitioned up through the lighter or more yellowy greens, and then into the yellows.

I’ll be honest and tell you that while I was working on the hat I fussed in my head about which colour should go next, but I don’t think it was necessary. There was so much going on visually with 4 strands of variegated yarn, and I had so many colours that were somewhat close, that each individual change of yarn didn’t make a huge difference. The hat is knit on the knit side and then turned inside out after it is finished, and the colour changes are much more subtle on the purl side.

I made the size “adult S/M”, but after blocking it fits an adult M or 22″ head. If you are knitting for a smaller head (20.5 to 21″) I suggest going down a size. The fabric is heavy, a bit on the dense side (which makes sense, sock yarn doesn’t tend to be fluffy stuff).

Size

  • baby (toddler, child, adult SM, adult L)
  • fits head 16 (17.5, 19, 21, 23)” around

Materials

KNIT HACK Granny Stripe Ends (Part 6)

Granny Stripe Blanket Aug 17 Ends.jpg

For all the posts in this series, you can go HERE!

I’ve been making good progress on my blanket, I’d say it’s about 45% finished, but the ends have started driving me up the wall. They’re getting a little tangled and in the way when I work, so I’ve started weaving them in. I tried weaving them in from the bottom up, but it was too excruciatingly boring, and instead employed a childhood game. Like most kids, my brother and I weren’t into tidying or putting our toys away, so my mom came up with a game. Depending on the quality of our mess, sometimes she would have us put the toys away by brand, other times it would be by colour, or size. So I started weaving in my ends by colour – all the reds first, then the orange, then the pink … really whatever tickled my fancy. It worked, I was distracted from the tedious exercise and the ends thinned out.

Granny Stripe blanket Aug 17

KNIT HACK Weaving In The Ends

Weaving in the ends on a granny stripe blanket isn’t especially hard, but to make it look nice you’ll have to do it with a darning needle. Because of the granny stripe technique, the ends do not look nice worked in as you crochet, they will not be visible on the back of the work. As a reference, I leave a generous tail at the beginning and end of each row, at least 12″/30cm. Having a good amount of yarn makes weaving in the ends much easier and more secure.


Granny Spripe Blanket Weaving In Ends 1

1. With a darning needle weave the end you want to work (here GREEN) up in through the stitch or the same yarn above (so Green goes through Green). On rows where there is only one post or stitch at the start of the row you may want to go right through this post to conceal the yarn. On rows where there are two posts or stitches, you don’t need to do this.


Granny Spripe Blanket Weaving In Ends 2

2.  Thread needle through the tops of the stitches of the colour you are weaving in (the Green end goes into the tops of the Greens) for THREE or FOUR full clusters or the colour of the row above (here you can see the needle going through two).


Granny Spripe Blanket Weaving In Ends 3.jpg

3.   Turn your needle and work back across in the opposite direction.


Granny Stripe Blanket Weaving In Ends 4

4.  At the end of the row evaluate your work, give it a small tug to make sure the yarn is settled, and you can trim your end.


Granny Stripe Blanket Aug 17 2

KNIT HACK Stash-Busting Sock (Part 4)


Granny Stripe Blanket BLOG July 11 2

For all the posts in this series, you can go HERE!

Grany Stripe Blanket

I am very pleased to let you know that my sock yarn stashbusting granny stripe blanket  is coming along swimmingly! Now that I’ve worked a few rows I’ve gleaned more insights ….

How Much Yarn?

If you don’t want to run out of yarn part-way through a row, you are going to need to know how much each row uses. I measured mine at around 9g of sock weight yarn, but everyone is different and this may not be the amount you use. You can glean this very useful knowledge fairly easily (I would wait until after you’ve worked a few rows and fall into a flow with the stitch):

  1. With your digital kitchen scale, weigh the ball of yarn you are about to use.
  2. Work a row, break yarn.
  3. Weigh the ball of yarn again.
  4. Subtract the second weight from the first weight – this is the amount of yarn you used.

Project Notes

I ALWAYS suggest that you keep project note in your Ravelry Notebook. You’ll inevitably need to remember something about the project at some point down the line, and all the details will be waiting for you there. It’s also helpful to see other people’s projects, so it’s nice to pay-it-forward, share and contribute to the community. Finally, you get to show off your work, people will say nice things to you and warm your heart.

Useful things to take note of:

  • hook/needle size used
  • tension/gauge of your project
  • yarn/s used
  • modifications made
  • finished measurements
  • advice you’d give other people about your experience, or anything you’d want to know if you did this project again

Establishing Timelines

Blankets are big-ish projects and I know myself – if I don’t finish this one by the end of the summer it won’t get done for a looooooong time. It’s good to set a goal like a best-before-date, and you’re most likely to be successful achieving a goal if you break down the work into daily quantifiable chunks.  I’ve measured my gauge and I’m working at approximately 12 rows = 4″ (10cm), or 3 rows per inch. I also measured my started project and it is about 65″ wide (unblocked), and I’ll aim to make a square blanket so it’ll be about 65″ high. There are about 50 more days until September. I have worked 25 rows so far.

Here’s how you figure out the math:

  1. 65″ high x 3 rows per inch = 195 total rows required
  2. 195 rows total – 25 rows completed = 170 rows to complete
  3. 170 rows to complete / 50 days to complete = 3.4 rows per day to complete

If I work 4 rows per day I should have this part of this project completed in about 43 days – not bad. I’ll still need to weave in the ends and work a border around the edge, so the extra week will be a good buffer to finish this project by September.

I’m not super disciplined, so to keep myself accountable I’ll print off a calendar and mark my rows every day. I kind of enjoy this approach, if I fall behind I know I have to catch up the next day, or I’ll work ahead of time and carry that balance forward. Really, whatever works for you is good.

Not sure how long it takes for you to complete a row? No problem, just time yourself working a row using the Stopwatch function in the Clock App on your smartphone or tablet (I have an iPhone, but if you have another just Google how to find and use the stopwatch function, Google knows everything). I just timed myself and it took about 18.5 minutes to complete a row (probably not my best time, but it isn’t the Olympics).

KNIT HACK Stash-Busting Sock (Part 3)


Crochet Blanket Swatch BLOG.jpg

For all the posts in this series, you can go HERE!

Swatching

Before you start your project I urge you to swatch, especially to find the right needle or hook size. For crochet, holding one strand of sock weight yarn, a 3.5/E hook is generally good (if you are a tight crocheter, if you are loose go down). For knitting, holding 2 strands of sock weight yarn together, 4.5mm/US7 or 5mm/US8 needles should be good. Everyone’s tension is different, so play around to find the size that you are comfortable with.

I always keep track of my choices in my Ravelry Projects, it’s a great place to keep your notes because they never get lost and you can look info up from your smartphone.

Now, everyone emphasises how important swatching is for the success of your final project, and I can’t *make* you swatch, but I think I can motivate you to swatch. I made a small swatch and am glad I did, as I found out several VERY useful things …

I made a smallish swatch (see picture above), about the size of a blanket for a doll, and am glad I did, as I found out several VERY useful things … knowledge is power! 

Hook Size

I preferred a 3.25mm crochet hook since my crochet tension is on the loose side. I also found out that I have two D hooks made by the same company (in different styles) that are actually different sizes: one is 3mm and the other is 3.25mm. 

Project Changes

I wasn’t loving my yarn worked up in a log cabin style, it didn’t suit the predominantly smooth texture and mostly variegated colour ways. I am changing to a granny stripe blanket .

Enjoyment

I found the granny stripe blanket quite easy and simple. I thought I might find it a bit boring, but I think it’s actually kind of zen, and frees up my mind to play with colour.

Accurate Measurements

I now have a more concrete tension measurement. The pattern is a multiple of 3 plus 2, so I swatched with a chain of 41 stitches, which measured approximately 8.5″ (I laid it flat on a table and measured with a ruler. I did not get around to blocking, but for a true gauge measurement you really should, as textiles can loosen up). Your tension will not be the same as mine, you need to check yours for an accurate measurement.

Project Size

I have a lot of yarn, but I’d like to finish this project this summer, so I’ll make it a lap blanket size, approximately 6 feet or 1.8m (182cm) wide should be sufficient. A chain of about 348 should be right. The pattern is a multiple of 3 plus 2, so 347 would be the right number.

Alternate Techniques

I followed the pattern and did not enjoy the long chain that you start with (the prospect of 347 wobbly chains doesn’t appeal), or how you have to enter the stitches in the first row. I’m not a novice, so I’m going to try starting with a “foundation since crochet” (FSC) chain. I like the idea of starting with an FSC because it gives me a good idea of how wide my work will actually be (unlike a regular chain, which really isn’t helpful in that department), and it will be easier to work the first granny Row into. I’ll swatch this first to make sure I like the look and the technique works for me (no point in making 340 stitches and finishing out I don’t like it). Before I start the real project I’ll also have to decide if this is the colour I want the first border to be. And of course, I have to practise the FSC, it’s been a while since I’ve done it and I need to consult a tutorial for a refresher (The best instructions I’ve ever come across is in Jennifer Hansen’s Broomstick Lace Craftsy Class, but Purl Soho has a decent tutorial on their blog).

NOTE: after a practice go I also found that the FSC was tight on a small hook and should be worked on a slightly larger hook, I’ll try a 3.25mm or 3.5mm next time. Oh, and if you go with the FSC, most tutorials will tell you to put a pin in at a specific point -DO THIS, especially if you put your work down in the middle (otherwise you’ll never find where you are supposed to pick-up).

Colour Choices

I’ve been sorting out my approach to colour and experimenting as I swatch ….

1. The first aesthetic choice was to evict all of the muted colours. They weren’t making me happy blended in with the more saturated colours, so they are outie and can emerge at a later date in another project. The second colour issue I found was that I am very uncomfortable with the random look.

2.  I found that I am very uncomfortable with the random look.

3. The granny stripe pattern works with two rows per colour, but I like one row, it looks scrappier.

4. I like the occasional row of semi-solid colour, I have a lot of  yarn with complex colouration and the solids seem to break up the business of the variegated colours.

5. I like alternating between a dark/muted colour and a light/bright colour.

6. I think I will cycle through a row of each type of colour: red, orange/peach, yellow/gold, warm green, cool green, turquoise/aqua/teal, blue, cool purple warm purple, light pink/dark pink.

Fibre Choices

I’m enjoying the multi-ply yarns more than the single ply yarns. I don’t think I want this particular project to be a melange of different textures and just kind of stick to playing with colour.


Choosing a Colour Palette

If you are NOT artsy

If you are bad with colour and not very artsy, the most expedient choice would be to work with an ombre or a gradation. This means working through your colours in the order of the rainbow or something similar (see the colour wheel below for an idea) and within each colour group from light to dark. I like the KISS principle: Keep It Simple Sister! Another approach is to browse through other people’s projects on Ravelry.com, Pinterest, or instagram and find something that you enjoy – there’s no sense in reinventing the wheel, right? 

If you are KIND OF artsy

You have a choice to make: do you prefer chaos or control? Do you want your colours to complement each other and be harmonious and designy, or do you want them to clash and look random and scrappy?

colour wheel 1

Harmonious

If you want it harmonious consider placing cool colours (green, blue, purple) next to each other and warm colours (red, orange, yellow, pink) next to each other. Hold colours next to each other and squint your eyes (or remove your glasses) to get a better idea of whether they blend or clash.

Above is a colour wheel, which is kind of mysterious to people who have not been to art school or taken art classes. The colours opposite each other in the circle are a VERY high contrast and make each other ‘pop’ (it’s a bit of a harsh combination to my taste, I don’t really like them together). Colours next to each other in the circle are blendy. The colour next to the one at the opposite end of the circle often look nice

Clashy

If you like it clashy, combine colours that are opposites. Put bright or light colours next to dark or muddy colours. Place warm colours (red, orange, yellow) next to cool colours (green, blue, purple). Use a random number generator app (available free in your phone or tablet app store) to help choose the next colour group.

Personally, I like a controlled chaos. I’ll use a random number generator, but if I don’t like the choice I’ll run it again (and again, and again) until I come upon a colour combination I like.

If you ARE Artsy

You don’t need my help, you’ve already got it goin’ on.

KNIT HACK Stash-Busting Sock (Part 2)

For all the posts in this series, you can go HERE!

On Tuesday I talked about blanket projects that are perfect for sock weight stash-busting. Today I’m going to help you make your blanket look GREAT!  In 2014 I ploughed through my stash of bulky weight yarn and made my parents a magnificent house-warming blanket, and I’ll share my system with you.

NOTE: If you don’t have suitable stash yarn but want to make a Granny Stripe or Corner to Corner blanket (or something along those lines, I suggest using Cascade Ultra Pima and a 4mm hook (you’ll need at least 10 skeins for a lap blanket)

What You’ll Need

  • Large table or flat surface to work on
  • Large Ziploc bags, about 10 to 20
  • Masking tape & permanent marker
  • Digital kitchen scale (optional)

blog scrappy blanket 4.jpg

Preparation

1. On a large table or flat surface lay out your stash and group yarns by colour: pink, red, orange, yellow, green, turquoise, blue, purple, brown, cream, grey. Personally, I have broken my stash down into subsets: light pink, dark pink, red, orange, peach, yellow, warm green, cool green, green-blue, turquoise & teal, blue, cool purple, warm purple, brown, cream, light grey, dark grey.

2. If you have variegated colours that you don’t know where to put them, hold them next to each colour group and choose the one it blends with. If it doesn’t match anything (I had one odd-ball), you can either keep it as a wildcard or leave it out of the project.


blog scrappy blanket 3.jpg

3a. Bag your colour piles. Each subset gets it’s own bag.


blog scrappy blanket 2

3b. If your project is going to be a gradient or ombre, label each bag with it’s order of sequence (1, 2, 3, 4, … etc) with masking and a sharpie, and leave space on the label to write the weight later.

Blog scrappy blanket 1

4a. Weigh each bag and write down the weight on the bag. I recommend using metric measurements (grams) if your sale allows, it is precise (you can always convert to imperial measurements afterwards) and I round down.

4b. Add up the total weight of your yarn, and subtract about 50 to 100g for good measure. My total is around 3800g, which is probably enough to make a Queen sized bedspread. This doesn’t mean I *will* make a queen sized bedspread, I may not use ALL of my yarn, I might get bored with some colours, or only want to use a portion of them because I have so much (I’m heavy on the greens). About 1000g is ok for a lap blanket.

5. Evaluate your spectrum for gaps. You may or may not have noticed that I have next to no red in my stash, so I’ve bought myself a skein of red Fleece Artist Merino 2/6 in Ruby. I don’t have much yellow, but that’s ok, it’s kind of an accent colour, so I won’t use a ton. I also don’t have much in terms of a medium ‘pinky’ pink, just light and dark pinks, but I think I can live with that (if it starts to bother me I’ll buy some).

6. Wind up skeined yarn, but keep the label with them. If you don’t end up using that skein you’ll want to know what it is and how much of it you have.

7. Choose a project and/or method, for example:

Crochet

Knit

OK, I think we’ve done enough work for a day, in upcoming posts I’ll discuss strategies for combining colours and swatching. I know, swatching is a total turn-off, but my suggestions are sincere and come from my own, actual experience – it’ll be fun and EXTREMELY helpful. Seriously, I promise, it’s so, so, so useful. So good.


Blog scrappy blanket COMBO

New Year Stash Busters!

This project is easy, fast, and will use up ALL of your miscellaneous stash yarn. It is made with a basic Tunisian Crochet technique, but don’t let that put you off because it’s really easy, fun, fast, and anyone can learn it. You can take a class with us in store (private or project class), take an amazing online class from Craftsy (presently on sale for $14.99!), or teach yourself via Free Tutorials from Stitch Diva. For this blanket you only need to learn the base row, tunisian simple stitch, changing colours, 3 colour tunisian, and binding off – basically a beginner class. You do not need to know how to crochet to learn Tunisian crochet. 


A great project for using up smaller leftovers. Combine similar weights and fibres (worsted with worsted, bulky with bulky, animal fibres vs plant fibres).  I think this ribbing/colour combo would also be a great technique to use to make a simple pillow cover, especially with Noro yarns. 
  • Pattern available on Ravelry for about $3.50 CAD
  • 16″ circular & double pointed needles (6mm for bulky, 4.5mm for worsted)
  • bulky weight yarn, but you can sub worsted and cast on more stitches.


This project is a great opportunity to experiment and play with texture and colour. Yarns can be any thickness, texture or fibre. To get an effect like the picture above, choose base colours (hues) which are harmonious (blend well together) plus a contrast colour. For example, greens + teal blues, blues + purples, oranges + reds, reds + dark pinks, oranges + yellows, oranges + browns. You can also choose yarns that are all from the same base colour. In the example above the designer has chosen colours which are in the same colour family, orange, but vary in their value (relative darkness or lightness), plus a light beige for contrast.  They have also played around with the value of the colours, putting dark colours next to light/bright colours, which creates contrast and makes the colours ‘pop’. 
  • FREE pattern via Ravelry
  • 8mm-29″ (or longer) circular needle
  • bits of yarn in an appealing palette, size doesn’t matter


  • pattern available via Ravelry, individually or as part of the ebook Color by Number, or the MEGA ebook Coloring Book
  • Any yarn of any weight
  • needle size appropriate for yarn
If you don’t have the stash but you want to make the blanket any of the following would work beautifully:


  • pattern available via Ravelry, individually or as part of the MEGA ebook Coloring Book
  • Any yarn of same weight, as many colours as you like
  • size appropriate for yarn


This project can be a great stash buster if you’ve got a big pile of yarn that’s a similar weight and fibre. I I doubt its a quickie, but it is definitely a beauty.  It can be downsized to make a stunning baby blanket too!


This scarf is a great way to use up little bits & bobs of yarn that’s the same weight. The pattern stitch, linen stitch, is a dense one so increase your normal needle size about 1mm & check your tension
  • FREE pattern via Ravelry
  • fingering weight yarn, but you can sub sport or worsted
  • 4mm-36″ circular needles (or size appropriate for yarn)