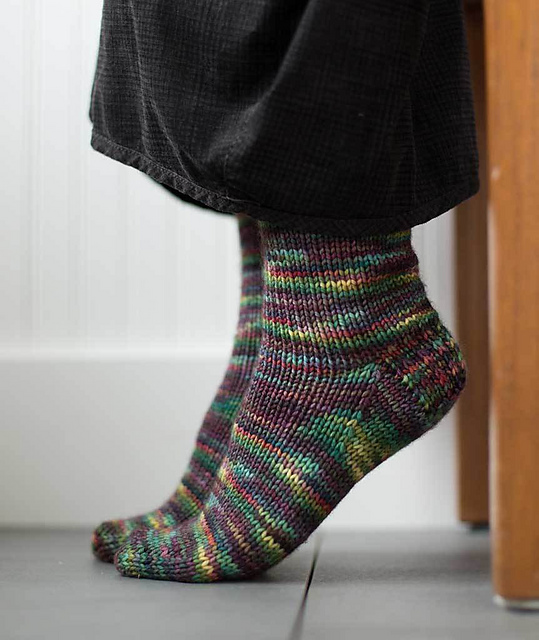
Manos del Urugay Alegria Grande is a sumptuously soft superwash yarn that’s great for EVERYTHING (except felting). Made with 75% merino wool & 25% polyamide, it’s strong enough for house-socks and soft enough for baby hats and sweaters for the entire family. This is also the perfect yarn for learning how to make socks (we use it in our sock classes with 3.75mm/US5 needles).
75% merino wool, 25% polyamide
100g/180m (197 yds)
worsted weight
18 to 20 sts = 4″/10cm
4mm to 5mm (US 6 to 8) needles
Machine or hand wash in cold water, lay flat to dry
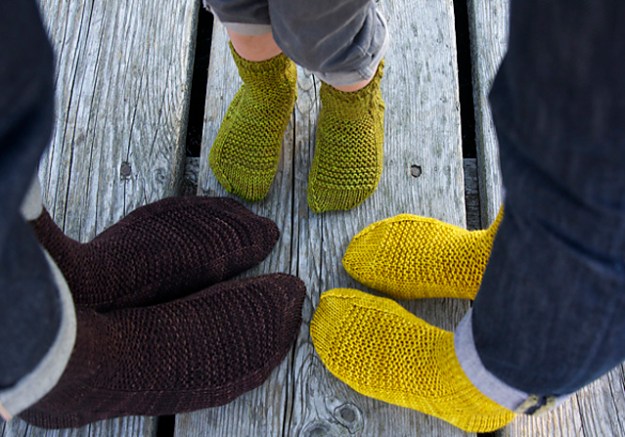
Manos Alegria Grande Semi-Solids are exactly the same as their muti-coloured siblings, but they are kettle dyed for a semi-solid aesthetic. They’re worsted weight, super soft merino, machine washable, and great for garments for people of all ages and sizes, from babies to grown-ups. Semi-solid colours are perfect for making a pair of Rye Socks (picture above), or other garments that involve lace, cables, or other textural details.
How Much Yarn Do I Need?
You should always check your pattern for yardage requirements, but here are some estimates:
Socks, hat, neckwarmer, mittens, wrist-warmers: 1 skein
ERRATA: Rows 13 and 14, (columns 24 and 26 when counting from right to left) of the Crown chart contain stitches mislabelled as “knit” that should be “no stitch”.
Last time we chatted I was showing off my latest project, Paprika, but like all accomplishments, a bit of work went into it before it happened. Before starting, I swatched … I know, you hate swatching, you avoid swatching, swatching is gross, swatching is boring, blech. I think I understand how a dentist feels, telling their patients to floss – it’s a Sisyphean task. Instead of listing all the important (aka. boring, grown-up) reasons to swatch I think I’m just going to share ….
I once read that designer Veronique Avery learned how to knit, and design, by making swatches EXCLUSIVELY for a year. That’s right a YEAR of swatching. When I read that, I thought “Wow, this lady is single-minded.” But you know what, I bet by the end of that exercise she REALLY understood hand knitted fabric. She understood how different fibres, different tensions, and different stitch patterns behaved.
Designers understand that swatching is knowledge. But swatching is more than just the way to make sure your project is going to fit. Swatching is a way to experiment with yarn, explore it’s potential, see how it behaves. It’s a way to decide how you like it, how you don’t like it. Will it do what you want it to do, will it look like you want it to? Most people remind you that swatching is a way to avoid being disappointed, but it can also be a way to find new things you like!
Initially, I was thinking about making the sweater with some colour. I grabbed 3 warm colours and cast on a little cowl based on the Snap hat I made a little while ago. Yup, that’s right, it’s a swatch AND a project. Squares swatches are ok, but not so much fun. To start with I was playing with colour, so the tension didn’t matter, and I made something that made me happy – an actual garment (which is what the end product will be, anyway).
I initially thought I’d be into this colour combo, but once it was done it was full of NOPE (at least for this sweater)! Such is life. But I did find out how the yarn knitted at a new tension, what it looked like on both sides of the fabric, how some of the colours looked combined, and I have a great little cowl! (all of the project details are in my Ravelry Project Notes)
Following up on my colour-speriment, I thought maybe I’d rest my eyes and try a neutral ombre/colour gradient. So I made a cowl to swatch the tension and colours. The fabric is lovely, the colours blended well, and my swatch, a cowl, is lovely (an added bonus). But as I thought about the sweater, I decided simple was better, and that figuring out when to change the colours in the sweater felt like too much work for me. Sometimes the KISS (Keep It Simple Sister) principle is extremely effective!
Drops Brushed Alpaca and Silk is a great yarn to play around with colour gradations and colour combining. The strands stick together and the texture blends nicely. As far as a swatch, it gave me my tension information, helped me narrow down my colour concept, and its a really nice, light, airy cowl! I haven’t written the cowl up as a formal pattern, but all the directions and details (needle sizes, yarn colours) are in my Ravelry Project Notes.
Following the second cowl (and a couple other swatches that I really did not enjoy, and I pitched the results) I learned a lot:
The yarn is really nice and soft, very cuddly and cloud-like
It’s quite versatile, it adapts to a whole bunch of different tensions
I like combining the colours in some projects but not in others
If I’m going to make an ombre sweater, it is best made from the top-down (so I don’t have to think too much about colour placement, matching the arms to the body, etc.)
I now have a reference for how some of the colours look combined
And of course, the most important thing I learned from the process, was that I really enjoyed working with this yarn, and I wanted to keep exploring it in different ways. At the risk of sounding like the final paragraph in a serial mystery novel … I did, and the results were unexpected! But You’ll have to wait for the next instalment to find out more.
I just finished this little neck-a-ma-thing, and it turned out really well! The pattern is Annabella’s Cowl, and the yarn is Fleece Artist Back Country, a super soft, machine washable merino wool made right here on Canada’s East coast. The yarn wasn’t exactly like the ones they called for in the pattern, so I used a larger needle and cast on fewer stitches (you can find all of our modifications in our project notes on Ravelry).
The project only took one skein of Fleece Artist Back Country, and I’m happy with the size – not too big, not too tight. The pattern was extremely easy, it’s definitely beginner friendly (probably a good project for a novice once they’ve learned knit and purl. It’s a great knit in front of the TV kind of project, especially if you need to whip up a gift in a rush.
More Yarn Options
The pattern was originally designed with a yarn like Handmaiden Maiden Hair, which would knit up beautifully on 5mm/US8-16″ circular needles (only 1 skein required). It would also be yummy made with Drops Brushed Alpaca Silk (use a single strand and 5mm/US8 needles (two skeins) for a light, airy version, or two strands held together and 6mm/US10 needles (4 skeins) for a thicker, cozier neckwarmer). If you want a yarn option that’s a little less precious try Berroco Vintage Chunky (1 skein) with 6mm/US10 needles.
I love the pixelated, woven look of linen stitch, and I also love that working it in the round makes it super easy – it’s just the same two stitches for every round. The yarn, Manos del Uruguay Alegria, is one of our favourite staples, a beautifully dyed merino blend that’s super soft, but also has some resilience which makes it great for all kinds of garments, including socks! And as icing on the cake the company, Manos Del Uruguay, is a non-profit organization that was created to give economic, social and personal development opportunities to the women in Uruguay’s countryside (they’ve been a member of the World Trade Organization since 2009).
Materials
Manos del Uruguay Alegria: 2 skeins (1 skein each of 2 colours; contrast colour is a semi-solid, the main colour is variegated/multicolour) ON SALE TO SEPT 6
As I mentioned in yesterday’s post, I just finished a Stripe It Cowl, it just needed to be photographed properly. I used 4mm/US6 needles for the ribbing and 4.5mm/US7 needles for the body of the cowl. I’m super happy with it, and I think all of the colourways will look glorious!
Mini Knit Hack
One secret to a happy project: use the darker end of the colourway for the bottom of the project and the brighter colour for the top, darker colours look more balanced on lower parts. In my project, the pin & green is darker than the orange & blue, so it went on the bottom.
As you may already know, I’m already thinking about my own holiday gifts (I know. it’s sweltering out there, but I’m determined to get ahead of the curve this year). I really love this yarn, Urth Uneek Worsted, and I found this extremely simple cowl designed with it. It’s so easy a beginner can do it, and it only takes 1 skein and 1 pair of needles to make it – I’m thinking perfect last minute cottage project.
I encourage you to take a look at the finished projects to see how different colours knit up – I guarantee you’ll fall in love with at least one of the colourways. To get an idea about how the different colourways knit up you can take a look at the fingering weight version of the same yarn.
I just finished making this cowl myself (I’ll photograph that pronto, promise) and it fits casual and loose. If you want something more fitted you should omit some stitches.
Superwash yarn tends to loosen up after being washed. If you like your cowls on the drapy side, stick with the prescribed 4.5mm/US7 needles. If you like the fabric a bit more firm, go down to a 4mm/US6.
I find really interesting things when I browse through the patterns on Ravelry …. one of the things I found this week was a micro-collection of the same cowl made over and over again in different colourways of Urth Uneek Fingering (ON SALE UNTIL THE END OF JULY). I thought it was awesome that this knitter, Deb-Knits, enjoyed her project and the yarn so much that she wanted to continue exploring and experiencing it. I also get it, the project is GORGEOUS, and it illustrates that all the colourways of Urth Uneek Fingering work up beautifully. And hey, is it ever too early to start holiday knitting?
Our loose cabled cowl is a last minute knits that work up FAST! We made ours light and airy on 15mm/US19 needles and two skeins of Malabrigo Rasta, but you can also you one Cascade Spuntaneous.
Our Bulky Mobius Cowl is a great little last minute gift. It works up fast on 10mm/US15 needles and the mobius technique makes it entertaining. The yarn, Malabrigo Rasta, is stunning: it’s buttery soft and I’ve never seen a skein that didn’t knit up like a Monet painting. Plus, it’s a one-skein project!
Malabrigo Merino Worsted is simply divine, squishy, knitting pleasure. It’s a single ply, super soft merino wool with tons of loft (it fluffs up). Use it for anything worn next to the skin – it’s so soft and airy you’ll want to cuddle up in bed with it. Note: this yarn must be hand washed (it felts like a beast), but it’s so soft it not only feels like a baby’s bottom, you can also wrap a little tush in it too! It can also be knit very densely, which makes it great for knitting stuffed toys.
We made this cowl a million years ago, but it’s a classic and people still love it and make their own. Two skeins of Malabrigo Merino Worsted were enough to make a proper cowl that wraps twice.
I thought this cowl would make a great one-skein gift idea, so I gave it a try and I think it worked out really beautifully! I used one of my favourite bulky weight yarns, Diamond Luxury Baby Alpaca Sport, and the end result is SUPER soft and cozy! I had to make some modifications to make this project come out to it’s fullest potential, so please read the notes below before starting (and maybe print them off and keep them with your pattern instructions).
HACKS & Modifications
I made some changes to the pattern because let’s face it, you often get what you pay for with a free pattern.
For the ribbing, I went down to a 5mm/US8 needle for the ribbing. 2×2 rib is normally a looser tension than other stitches, and you need to go down a needle size to mitigate this and prevent the ribbing from fanning out later.
For the cable section, I went up to a 6.5mm/US10.5 needle, because the yarn is very fluffy and airy. If you are using a denser yarn with more definition (see suggestions below) you can stick with the prescribed 6mm/US10 needles
Because my yarn is big and fluffy, and has a lot of aura (haze), the cable from the original pattern was not showing up or working well, and I had to switch it out for another type of cable that would show better. I went with a simple braided cable that I was already familiar with, Chart A from Lopi Braided Hat & Mitts. It is the same number of stitches as the original cable, so I just did the new cable instead of the old. If you use a yarn with more definition (see options below), you can do either cable.
I worked 6 rounds of ribbing at the top and the bottom (to conserve yarn).
I worked 4 pattern repeats from Chart A of the Lopi Braided Hat & Mitts, and changed to the ribbing after finishing row 6 of the chart.
I don’t usually bother using a cable needle. Making cables without a cable hook is not a skill for the novice, but if you are feeling intrepid and are comfortable with retrieving dropped stitches and are good at ‘reading’ your stitches (recognizing where and what they are), you should definitely it give it a try, it can save you a lot of time and effort: https://www.youtube.com/watch?v=-6DB6WhAKvY
If you need to conserve yarn or change the size of the pattern, you can omit the first 4 sts of the pattern (the single rib at the start doesn’t really do much for the design). In *my project* (yours may be different), based on the total number of rounds, each stitch represents about 40 sts in the scheme of the entire pattern. Omitting 4 sts from the cast-on will give you about two extra rounds. Each cable represents 8 stitches, so you can increase or decrease the pattern in a multiple of 8 sts. If you want to modify this for a child you’ll definitely want to omit stitches, it fits an adult comfortably.
We chose to use a fluffy, warm alpaca yarn, but you can use something firmer, which will give your cables more definition and your cowl less slouch – just use 6mm/US10 needles.